Throw New Fault : 👉 You can create and throw your own faults in an integration with a Throw New Fault action.You can use this inside for-each action, switch action etc. Using this action item you can Validate the input data also (check below hands-on practice).
While configuring this action in an integration, you have to enter below details :
*Code - enter error code (ex-"error_001")
Reason - enter error reason (ex-"Invalid Input")
Details - enter error detail (ex-"missing name")
Skip Condition - Define a condition to prevent the fault from being throw in the skip condition version of the expression builder (ex-"Number-1>Number-2)
Deleting the Throw New Fault action has no impact on downstream activities because this error does not have any output.
#Hands-on Practice :
Use Case : We will see the steps to develop an APP Driven Orchestration Integration which can do Subtract Operation by invoking Calculator SOAP service. This Integration will have two inputs (Number-1 & Number-2) which we will pass as inputs while testing this Integration.
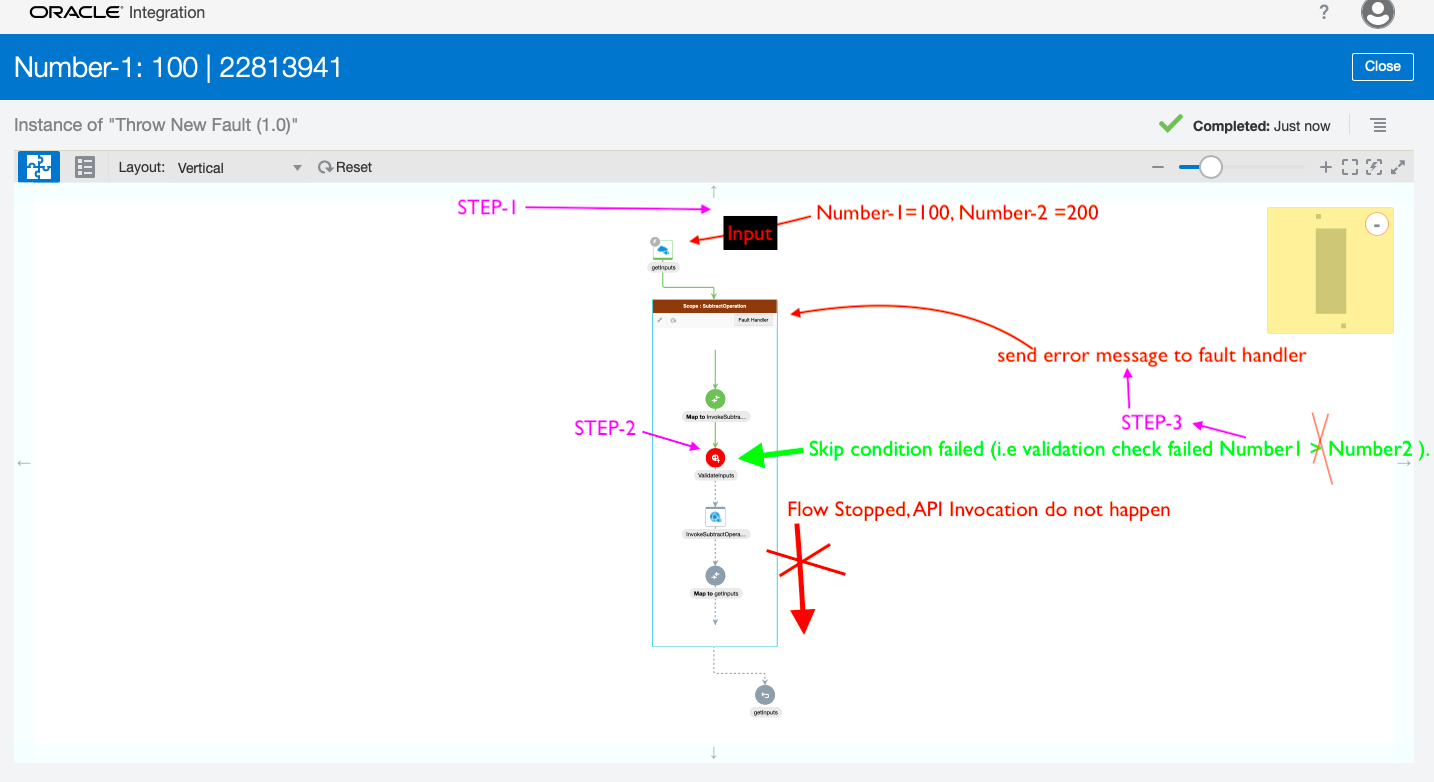
Then we will add Through New Fault activity before invoking Calculator Service and Validate whether Number-1 > Number-2. If Number-1 is not grater then Number-2 ,Through New Fault action will get execute and send custom declare error message, also stop the execution of flow right there, subtract operation will not happen.(i.e. Calculator Service Invocation will not occur).
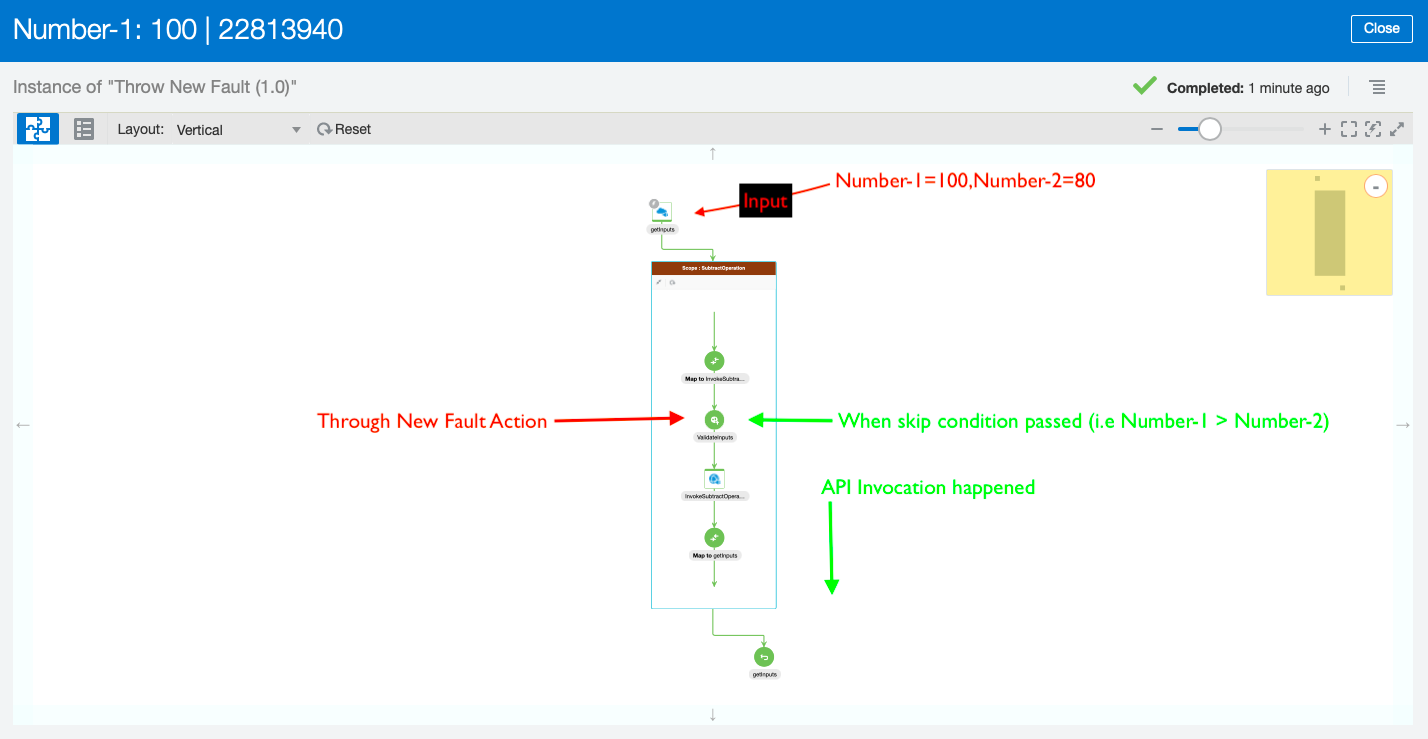
You can see below image to understand what exactly we are going to develop :
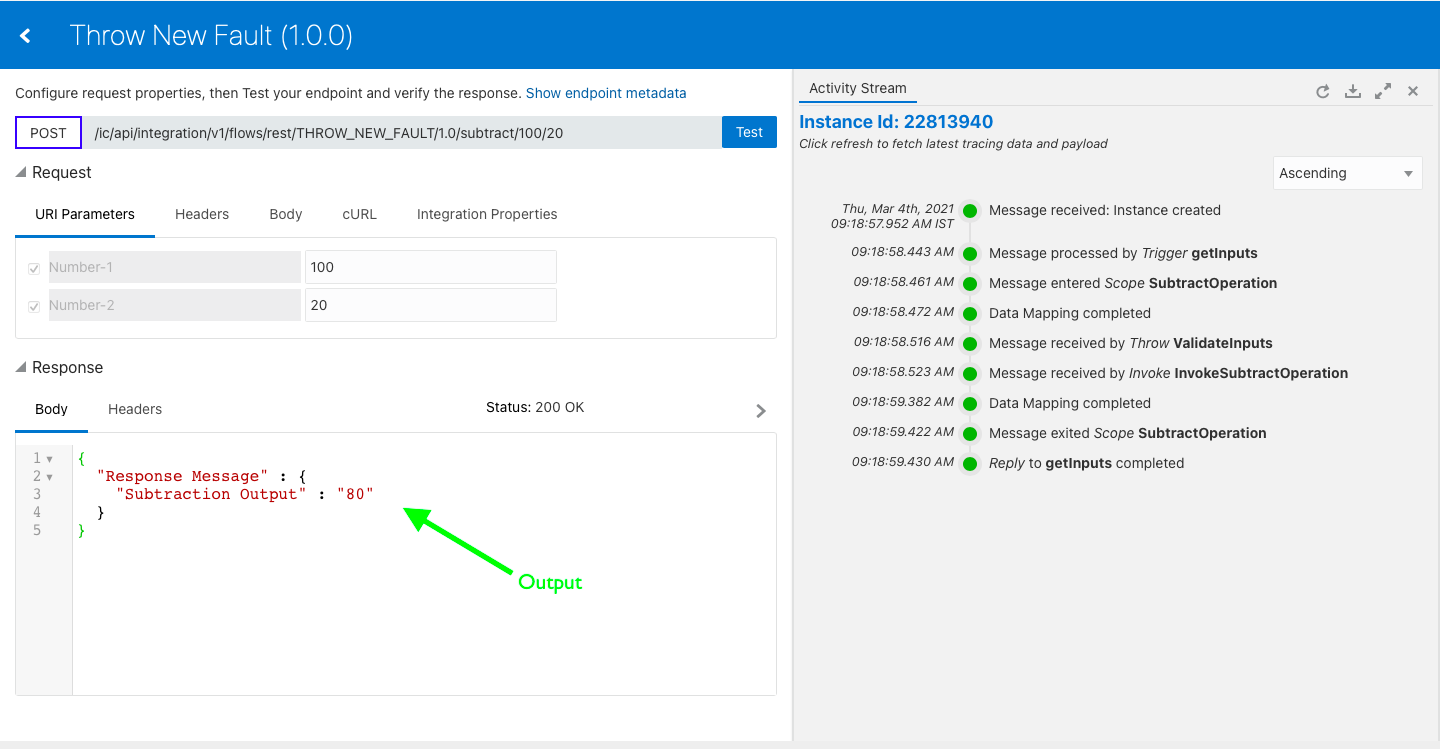
When Number-1 > Number-2
👇

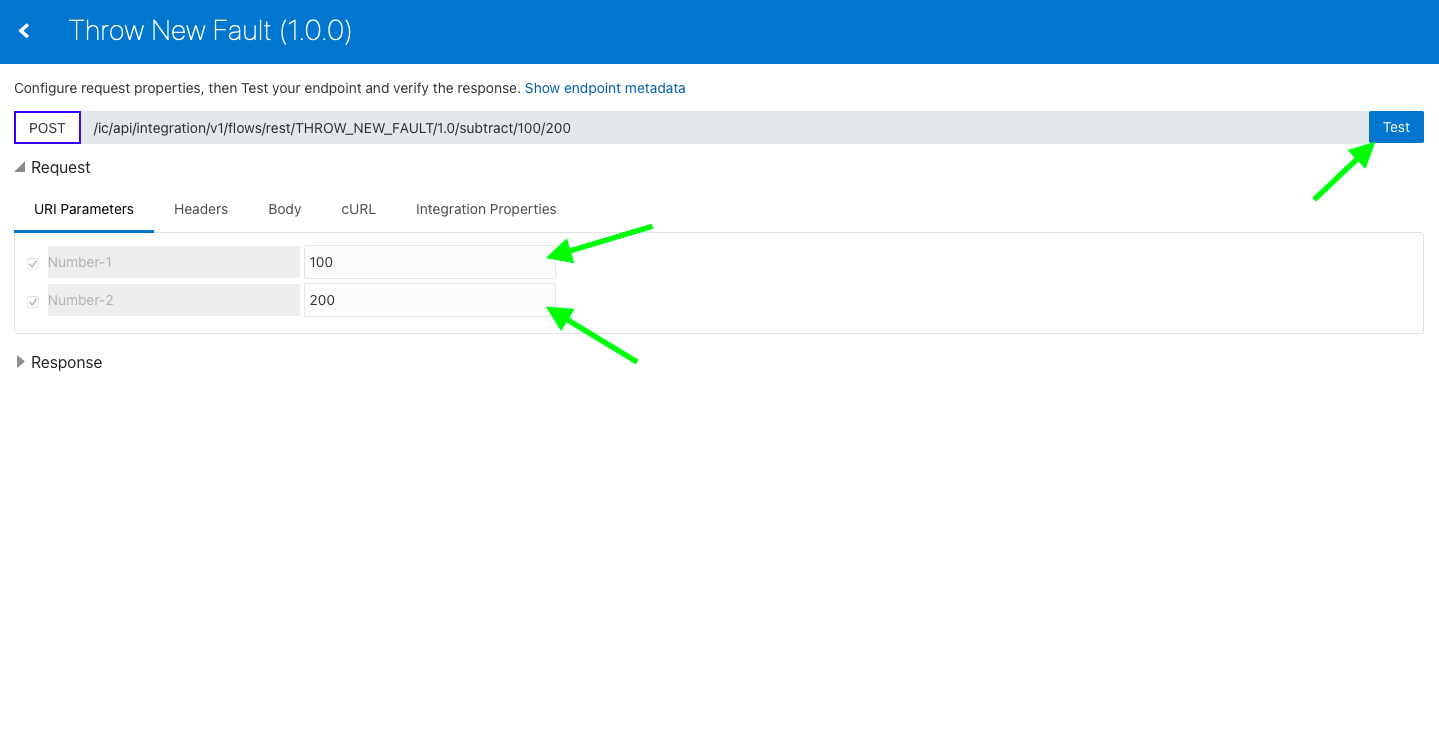
When Number-1 not greater then Number-2
👇
Sample of Self declare custom Error Message
👇
I hope now the flow is clear for you, now we can develop the Integration
Lets Develop the Integration : ☺
Prerequisite :
💢 A REST Trigger connection. If you don't have, you can access this blog post and can create it.
💢 A Calculator connection. Please click here to access the article to configure the connection to access Calculator Service.
Step 1 : Create APP Driven Orchestration Integration.
Step 2 : Configure REST Trigger connection
- Add the REST Trigger connection which we have created in above prerequisite section.
(if you don't have created yet ,you can access
this blog and create it )
- Enter any meaningful endpoint name & then click Next
- Now use below data inside Resource Configuration Wizard and then click Next
- *What is the endpoint's relative Resource URI ? : /subtract/{Number-1}/{Number-2}
- Action : POST
- Select ✅ Configure this endpoint to receive the response
- Request Query Parameter automatically get populated. Just select the datatype as Integer and then click Next
- Configure the Response Payload by selecting response payload format as JSON Sample and then click <<<inline>>> , enter below JSON. Click Ok
{
"Response Message" : {
"Subtraction Output" : "",
"Error Code" : "",
"Error Reason " : "",
"Error Description" : ""
}
}
- Click Done. REST Trigger endpoint configuration completed.
Step 3 : Add one Scope action
- Enter any meaningful name and then click Create
Step 4 : In this step we will invoke Calculator Service using the SOAP connection which we have already configured in above prerequisite section. If you don't have configured yet , requesting you access this blog and create the connection
- Search for Created Calculator Connection and click on it
- SOAP adapter endpoint configuration will get opened. Enter any meaningful name for the endpoint and the click Next
- Configure the operation by selecting below options
- Select the Port: Select CalculatorSOAP
- Select the Operation : Select Subtract and then click Next
- Skip the window, click Next
- SOAP Endpoint configuration completed. Click Done
- Now open the mapper and map the elements as given in below image.After mapping click validate and close the mapping.
 |
| click on image to zoom out |
Step 5 : Now in this step we will add Throw New Fault Activity and configure it to Validate the Input Data and if Validation Fail, it will through Error and stop the execution of the flow right there.
- Search for Through New Fault activity and add it between Mapper and Invoke Connection (as shown in below image)
- Enter any meaningful name and then click Create
- Configure the Throw New Fault action as given below. Inside this window actually we have to provide our custom error detail. Click on edit icon ✎ and enter the below sample detail :
- *Code : enter "400"
- Reason :enter "Invalid Input Data"
- Details : enter error details message : Input Number-1 is not greater then Input Number-2. Hence Subtraction operation is not possible"
- Now lets configure the Skip Condition which will stop Throw New Fault action to being execute. If this Skip condition check fail then Through New Fault Action will get execute and throw Error error message.
Configure below mathematical operation by dragging and dropping the Input variable from left hand side of expression window.Make sure to put the number under Integer Function.Please take reference from below image.
Integer (Number-1)>Integer(Number-2)
 |
| Click on Image to Zoom Out |
Step 6 : Lets map the response of the Calculator Service Output with the Integration Output. - Drag and Drop the "getInputs" Mapper inside the Scope by clicking at Reposition tab
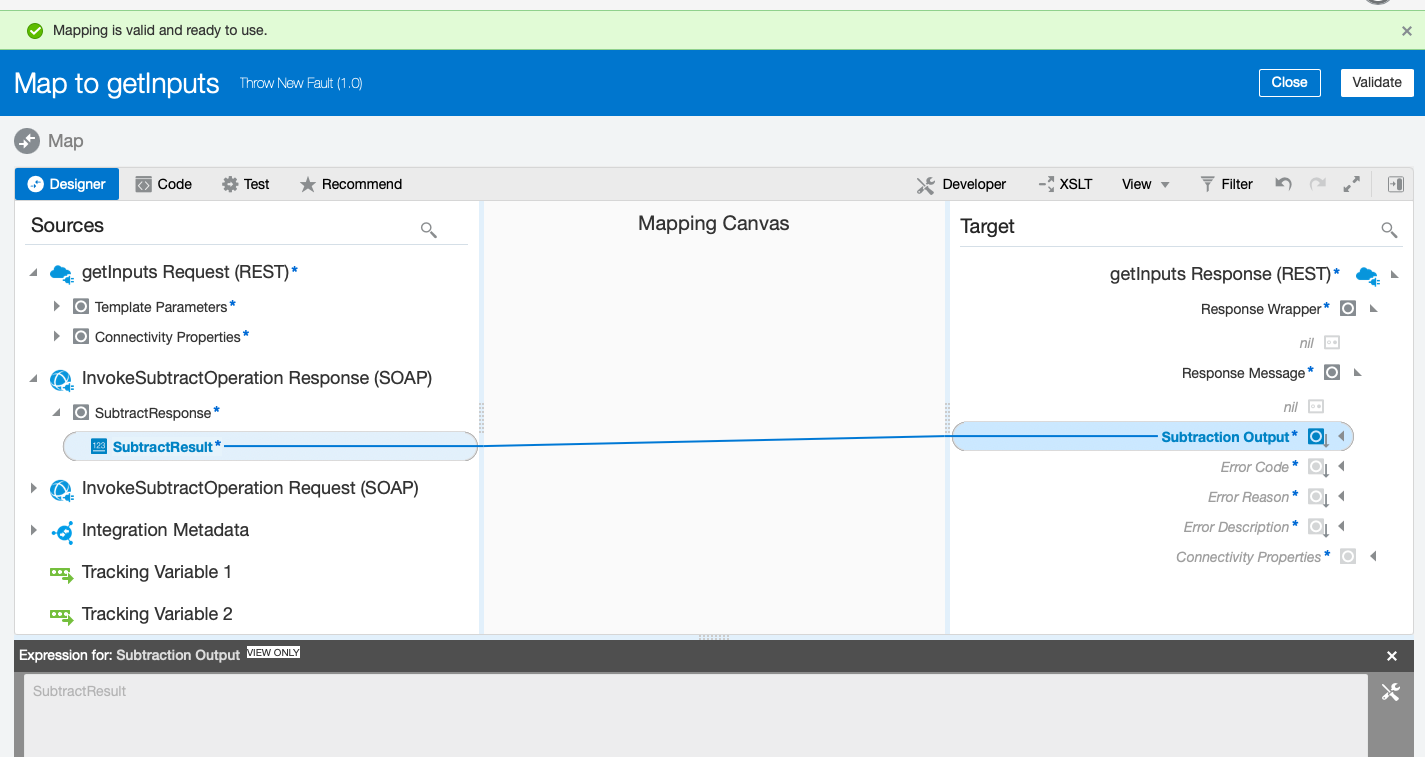
- Open the Mapper by click Edit icon and map the Subtract Response with the Integration Output Element. (take reference from below image)
SubtractResult* ----- > Map With ----> Subtraction Output*
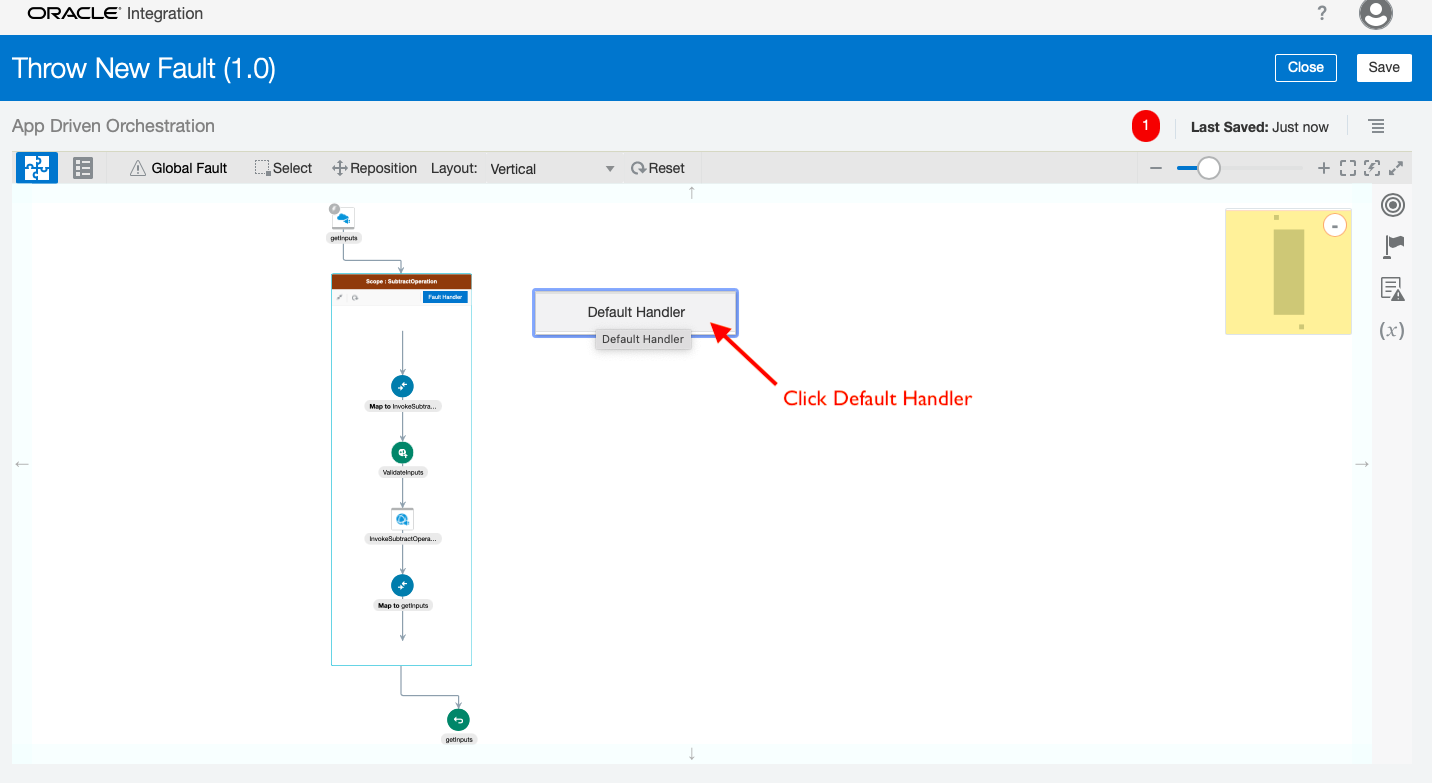
Step 6 : In this step we will declare default handler of Scope and map the Through New Fault Object details. If above configured Through New Fault execute it will send error detail to scope fault handler
- Click Fault Handler (present above right hand side in SCOPE) and then select Default Handler
- Add Return activity and then open its mapper
- Map the Throw New Fault Object elements with the Target element (Integration Output).This will help us to get error message as integration output if fault happen
 |
| Click on image to zoom out |
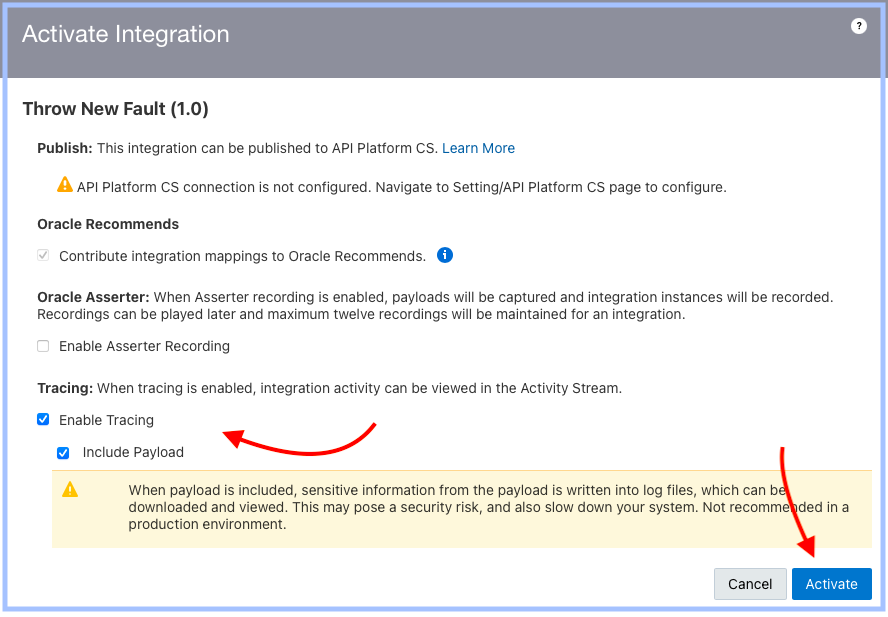
Step 7 : Finally enable the Tracking variable for the integration.
- Click on hamburger sign and then click Tracking
- Drag and drop the Template Parameter (Number-1,Number-2) inside Tracking Field. Click Save
Step 8 : Integration development completed. Click Save and Close the development Window.