' oicbasics: 2021
December 16, 2021

Upload File to UCM | Oracle Content Management Server | HCM Cloud

In this article we will see the steps to Upload a file to Oracle UCM (Universal Content Management server) through HCM Cloud application.


STEP 1 : Login to  HCM Cloud SaaS application


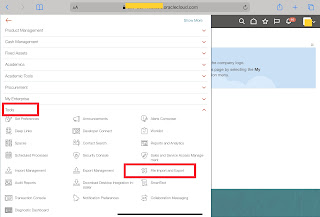
STEP 2 : Expand the navigation bar and then expand Tools and then select ↑↓File Import and Export


STEP 3 : click on the + icon and upload the file. Select the account as per your requirement. Click Save and Close

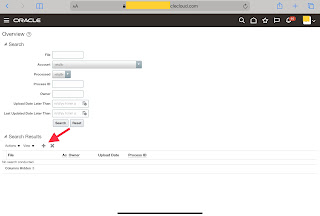
That's it. File successfully uploaded to UCM. You can see the  Process ID  get generated.


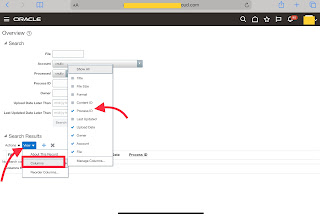
Note : If you are not able to see the process ID column then click on view, columns and select Process ID. 


Steps to check File in UCM Server :

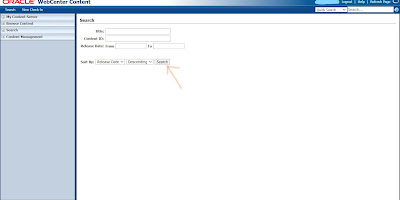
  • Login to UCM Content server , UCM URL : https://<saas domain >/cs  (example : https://eiiv-dev14.fa.us6.oraclecloud.com/cs )
  • Click on search button. You can see the file recently got uploaded


Thank You !
November 9, 2021

Clone an Existing Integration Flow in OIC | Cloning | Oracle Integration Cloud

In this article we will see the steps to clone (or copy) an Existing Integration flow. Lets see the cloning steps with an example where we will clone existing 'Hello World' Integration flow.


Step 1 : Open the integration Cloud Home page, click Integrations to navigate to Designer Home page.


Step 2 : On the Integrations page, locate the Hello World  integration flow. Click the menu option and then select Clone.


Step 3: Give the new integration an unique name and then click Clone. This way you have successfully cloned (or copy) an old integration. Now you can make changes in it as per your requirement.


Thank You !

August 2, 2021

Create Free Trial OIC Instance for one Month | Oracle Integration Cloud

To Create Free Trial OIC Instance you must have Oracle Cloud Free Tier Account. If you don't have already and want to see the signup steps for it, Please access my previous blog (Click here).


*Note :  You won't be charged unless you select to upgrade the account. After one month your free instance will automatically get closed.

Steps to create Free Trial OIC Instance :👇 


STEP 1 : Sign in to your Oracle Cloud Free Tier Account. 


STEP 2 : Search Integration & then Select Application Integration.


STEP 3 : Select the (root) Compartment and then click Create


STEP 4 : Enter any meaningful Display Name and leave the other options as it is. Click Create


STEP 5 : It will hardly take 5 minutes and your Integration Instance will get activated


STEP 6 : Once Instance is 🟢 Active. Just click on the Display Name of your instance to access the Integration Instance Details.


STEP 7 : Click On the 🏡Service Console to Access the OIC Instance home page.


Congratulations! you have successfully signup for free Oracle Integration Instance.Now you can start your Integration development works.#EnjoyFreeService 😁


Thank You !
July 25, 2021

Delete a schedule from an Integration | Scheduled Integration | Oracle Integration Cloud

In this article I have mentioned the steps to delete a schedule from a scheduled Integration in Oracle Integration Cloud.


Knowledge :  👀 


Scheduled Orchestration ? : It enables you to create an integration that uses a schedule to trigger the integration instead of an adapter. After designing such integration, you can schedule when to run it.


Step 1: Deactivate the Scheduled Integration.


Step 2: Click on the hamburger sign and then click Schedule


Step 3: Select Delete Schedule by clicking on the right hamburger sign 


    • Click Confirm to delete the schedule.

Step 4 : This way you can delete any schedule from a schedule Integration. You can see the popup of confirmation message "Schedule was deleted successfully" as shown in below image.


Thank You !
You can access next blog if you want to know how to add new schedule
May 26, 2021

Package in OIC | Add package for Integration


Knowledge :  
👀 
Packages ? : You can group one or more integrations into a single structure called a package to easily import and export them to and from OIC service. Packages being optional, integration do not be a part of them. At least one integration is needed for a package to exist.


You can put Integrations inside a package using two different way :

1st -- At the time of Integration development only just enter the package name (as shown in below image )


2nd -- After integration development. Suppose you want to add package in existing (already developed ) integration.

Lets see the detail steps to add package in existing (already developed ) integration :


  • Deactivate the integration in which you want to add Package.


  • Once the integration got deactivated , click edit icon ✎

  • Click to expand the hamburger sign (top right ) Actions menu
    • then click Primary Info

  • Enter your package name in front of  Package column. In my case i have given INT_PACKAGE for example purpose. After entering Package Name click Save and then Close

  • Now you can Activate the Integration.

  • Package name got added successfully. If you want to cross verify just click on the  down arrow "\/", you can see the Package Name got populated in package column.


           Thank You !

May 25, 2021

Package Migration or Multiple Integration Migration | OIC Integration Migration

Please access the previous blog to check first part i.e Single Integration Migration steps.


In this article we will see the steps of Multiple Integration Migration or Package Migration : If your requirement is to migration multiple integration in one go then you have to put all the required migration in one package. You can put the package name while creating the Integration (as shown in below image)


Note: Suppose you forget to put the package name while creating the integration then you can give the package name after integration development also. To check that please check this blog.


Lets see the steps in detail for package migration with one simple example :

  • Create two simple scheduled integration and put similar Package Name (for example - INT_PACKAGE) in both so that when we migrate this package to new environment both of them got migrated automatically.


  • Now lets Export the Package 
    • In the left navigation menu , click Packages and then go to the row of the Package which you want to export. In our case we are exporting package INT_PACKAGE
    • Click on Actions menu menu & then click Export. Save the Exported file (.par file)


  • Now login to another OIC Instance where you want to import these integrations.
    • In the left navigation menu click Packages and then click Import


    • Choose the .par file (example INT_PACKAGE.par) which got exported in above steps and then click Import and Configure
NOTE : Integrations in an exported package do not contain connection credentials. You may provide this data before activating the integrations.


    • Once the package got imported successfully, you can see the Configuration Editor window. Here you have to configure the connections, lookups etc details. In this Hands-on example - Integration-1 & Integration-2 don't have any such connections or lookups, so just click the back arrow sign  <  to exit this window.

    • Migration of multiple integrations completed, now you can Activate the Integrations and can test them.


                  Thank you !
Top